À propos de moi
Je m'appelle Enzo VADROT, j'ai actuellement 19 ans et je suis étudiant en 1 ère année de BUT GEII au sein de l'IUT du Creusot.
Mon but est de devenir automaticien à la fin de mes études.
Mes passions :


Projet
Dans le cadre de mon année de Terminal STI2D, j'ai dû réaliser un projet avec des camarades que nous avons présenté aux Olympiades de Sciences de l'Ingénieur à Dijon en 2024.
Le thème des olympiades était le sport et nous avions donc décidé de réaliser un robot qui pose des plots afin de créer un terrain de sport. Personnellement, je m'occupais du cerveau
du robot, c'est-à-dire la programmation de l'arduino que j'avais décidé d'utiliser.
Arduino et robot
J'avais décidé d'utiliser un Arduino Uno R4 Wifi afin d'héberger un site web en local dessus. Le robot marchera donc à l'aide du site internet, le site internet étant une sorte de télécommande.
Voici le site internet que j'avais réalisé : (PS : il n'est pas très beau)

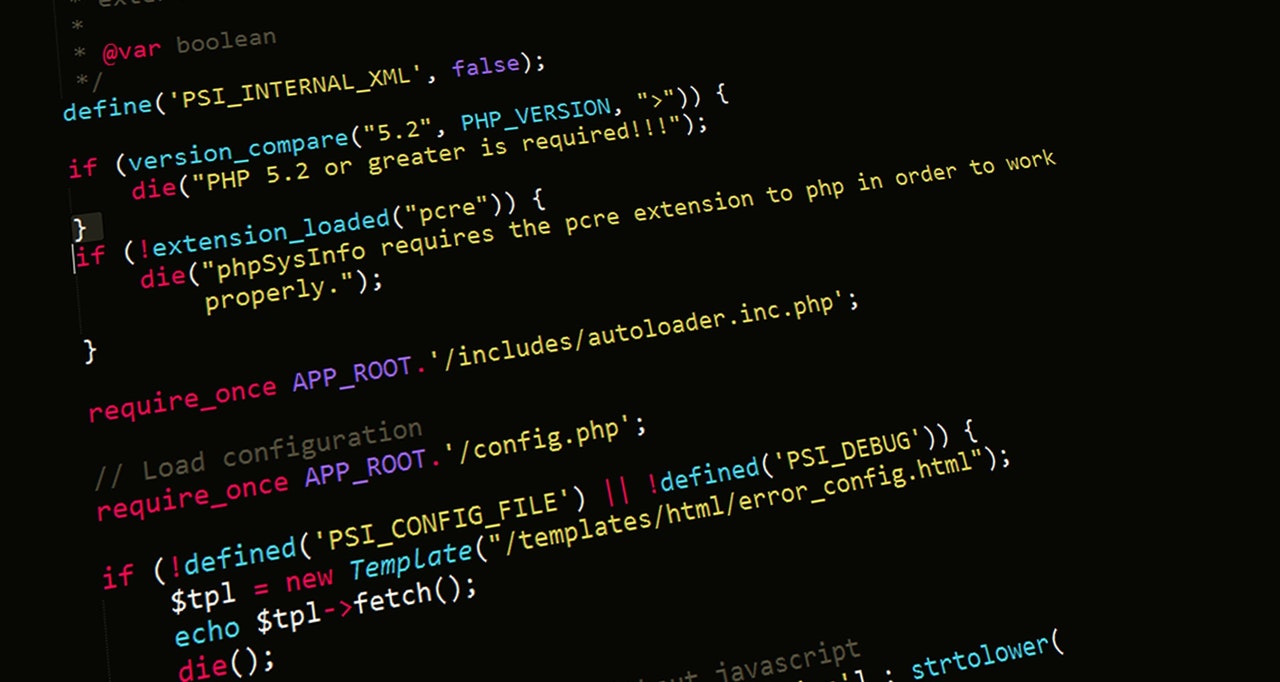
Voici les parties intéressantes du programme :
            void loop() {
              WiFiClient client = server.available();   // listen for incoming clients

              if (client) {                             // if you get a client,
                Serial.println("new client");           // print a message out the serial port
                String currentLine = "";                // make a String to hold incoming data from the client
                while (client.connected()) {            // loop while the client's connected
                  if (client.available()) {             // if there's bytes to read from the client,
                    char c = client.read();             // read a byte, the

                    Serial.write(c);                    // print it out to the serial monitor
                    if (c == '\n') {                    // if the byte is a newline character

                      // if the current line is blank, you got two newline characters in a row.
                      // that's the end of the client HTTP request, so send a response:
                      if (currentLine.length() == 0) {
                        // HTTP headers always start with a response code (e.g. HTTP/1.1 200 OK)
                        // and a content-type so the client knows what's coming, then a blank line:
                        client.println("HTTP/1.1 200 OK");
                        client.println("Content-type:text/html");
                        client.println();

                        // the content of the HTTP response follows the header:
                        client.println(CONTENT1);
                        if (etatRobot == 1){
                          client.print("Le robot est en fonctionnement");
                        } else if (etatRobot == 0) {
                          client.print("Le robot est arrêté");
                        } else {
                          client.print("Etat du robot inconnu");
                        }
                        client.println(CONTENT2);
                        client.println(CSS_CONTENT);
                        // The HTTP response ends with another blank line:
                        client.println();
                        // break out of the while loop:
                        break;
                      } else {    // if you got a newline, then clear currentLine:
                        currentLine = "";
                      }
                    } else if (c != '\r') {  // if you got anything else but a carriage return character,
                      currentLine += c;      // add it to the end of the currentLine
                    }

                    // Check to see if the client request was "GET /H" or "GET /L":
                    if (currentLine.endsWith("GET /A")) {
                        etatRobot = 1;
                        md.setM1Speed(400);
                        md.setM2Speed(400);
                        stopIfFault();
                    }
                    if (currentLine.endsWith("GET /S")) {
                      etatRobot = 0;
                      md.setM1Speed(0);
                      md.setM2Speed(0);
                      stopIfFault();
                    }
                    if (currentLine.endsWith("GET /G")) {
                      etatRobot = 1;
                      md.setM1Speed(400);
                      md.setM2Speed(0);
                      stopIfFault();
                    }
                    if (currentLine.endsWith("GET /D")) {
                      etatRobot = 1;
                      md.setM1Speed(0);
                      md.setM2Speed(400);
                      stopIfFault();
                    }
                    if (currentLine.endsWith("GET /P")) {
                      etatRobot = 1;
                      digitalWrite(7,HIGH);
                      delay(1000);
                      digitalWrite(relais,HIGH);
                      delay(500);
                      digitalWrite(relais,LOW);
                      digitalWrite(7,LOW);
                      delay(1000);
                    }
                  }

                }
                // close the connection:
                client.stop();
                Serial.println("client disconnected");
              }
            }
J'ai utilisé l'exemple SimpleWebServerWifi sur le logiciel et je l'ai modifié. La partie que j'ai intégré ici permet de charger le code du site sur la carte arduino ainsi que de permettre les mouvements du robot.
J'ai utilisé le fait que les boutons renvoies vers un lien en /A par exemple mais qui reste sur la page principale afin de pouvoir vérifier par la carte arduino la fin du lien. Ensuite, la carte arduino réalise
l'action voulu selon le bouton.
Il y avait aussi une seconde carte arduino qui gérait la distribution des plots. Un câble était connecté entre les deux cartes afin de réceptionner un signal.
Voici le programme :
            const int M4 = 7;
            const int E4 = 6;

            void setup() {
              pinMode(9, INPUT);
              pinMode(M4,OUTPUT);
              pinMode(E4,OUTPUT);
              Serial.begin(9600);
            }

            void loop() {
              if((digitalRead(9))==1){
                digitalWrite(M4,LOW);
                analogWrite(E4,250);
                delay(3000);
                analogWrite(E4,0);
                delay(1000);
                digitalWrite(M4,HIGH);
                analogWrite(E4,250);
                delay(3000);
              }
              else {
                digitalWrite(M4,LOW);
                analogWrite(E4,0);
              }
            }
Compétences acquises et mobilisées lors de ce projet
- Programmation de carte Arduino
- Réalisation d'un serveur Web
- Programmation d'un site Web